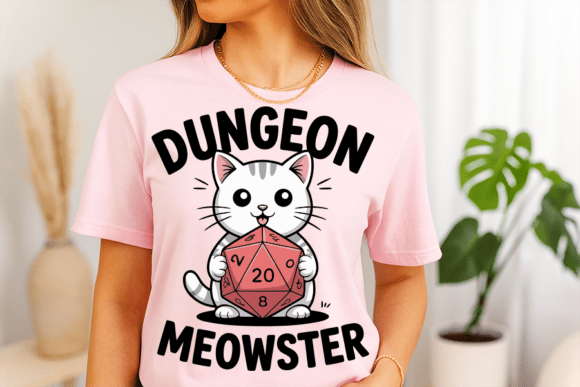
Cute Cat with RPG Dice: Choosing and Using This Versatile Vector Design
If you’ve stumbled upon the “Cute Cat with RPG Dice” design, you’ve likely found a charming cartoon illustration: a striped kitten with whiskers, a happy expression, and a large d20 die. It’s the kind of graphic that instantly adds a playful fantasy touch to gaming projects, tabletop nights, or any role-playing—themed craft. But before you download, buy, or use this file, a few practical details can save you time, frustration, and poor results. This article walks through common mistakes people make when choosing, applying, or preparing such vector assets, and shows you how to get the most out of this adorable kitten.
What the Design Actually Offers
The “Cute Cat with RPG Dice” file comes as a vector graphic (SVG, EPS, AI) plus a high-resolution PNG (300 DPI) with a transparent background. That means the illustration is scalable without losing quality, and the background is already removed. It’s ready for things like sublimation printing, vinyl decals, iron‑on transfers, scrapbooking, stickers, clothing prints, home décor, invitations, and even engraving. Many people grab such a design thinking it’s just a cute JPG, but the real power is in the vector formats—especially if you plan to resize, edit colors, or combine it with other elements.
Common Mistake #1: Ignoring Vector vs. Raster Differences
One of the most frequent errors is using the PNG file for everything—simply because it’s easier to preview. PNGs are raster images made of pixels. While the 300 DPI version is fine for small stickers or printed items up to around A5, enlarging it too much will result in pixelation. For instance, a banner or poster at 24×36 inches will look blurry if you rely solely on the PNG. The solution is to always use the SVG or EPS file for any project that requires scaling—such as large prints, signage, or engraving on a cutting machine. The vector format preserves every whisker and stripe edge even when blown up.
How to Avoid Pixel Disaster When Printing
Say you want to print the cat on a T‑shirt. If you open the PNG in basic software and stretch it to fit a full‑size shirt mockup, you’ll lose detail. Instead, import the EPS or AI into your design software (Adobe Illustrator, Inkscape, or even Canva for SVG support). Keep the original dimensions, then scale up proportionally. For professional sublimation, use the vector file to ensure sharp lines and smooth gradients. Many small business owners who skip this step end up with fuzzy prints that look amateurish—exactly what you want to avoid.
Mistake #2: Overlooking the Transparent Background
Another overlooked detail: the design already has a transparent background. That means you don’t need to manually remove a white rectangle. But some users still add the PNG onto a colored background without checking, then wonder why there’s an unwanted white square. Always preview the file in software that supports transparency (most modern photo editors and web browsers do). For vinyl decals, the transparent background is essential—it lets the sticker shape be the cat itself, not a square around it. The same goes for iron‑on transfers; you want only the cat and die, not a box around them.
Practical Tip: Check Your Software’s Vector Support
Not every program handles AI or EPS files well. Beginners often don’t realize they need Adobe Illustrator or a compatible tool to open AI files. EPS files are more universal but still require vector editing software for full editing. If you only own Microsoft Word or basic photo viewers, stick to the SVG format—it’s widely supported in modern browsers and many free tools like Inkscape or Gravit. Alternatively, the high‑resolution PNG can be used as a fallback for non‑vector applications, but you lose editability. Before buying, consider your workflow: if you design primarily in Canva, the SVG is your best bet. If you use a cutting machine like Cricut or Silhouette, SVG or EPS works great.
Mistake #3: Misjudging File Delivery and Extraction
This design is delivered in a ZIP archive. Some users, especially those new to digital files, don’t realize they need to extract the files first. They try to open the ZIP directly in their design software and get errors. The simple fix: right‑click (or double‑click on Mac) to unzip, then save the extracted files to a dedicated folder. If you’re using a mobile device, you may need a free file manager or archiver app. Planning ahead avoids confusion when you’re in the middle of a project and can’t find the SVG.
Mistake #4: Ignoring Resolution for Specific Print Methods
While the PNG is 300 DPI, which is standard for print, different methods have nuances. For sublimation, the resolution is adequate, but you must mirror the image before printing. Many forget this step and end up with reversed text or asymmetric cat faces. If your design includes no text (as this one likely doesn’t), mirroring still matters for certain fabrics or when the die graphic has a specific orientation. Always do a test print on a small piece of paper or transfer sheet first. For scrapbooking or card making, 300 DPI PNG at the original size works well—just don’t enlarge it beyond what the pixel count allows.
Mistake #5: Not Testing Colors Before Sublimation or Fabric Printing
The vibrant smile and striped fur can look different on various materials. Light cotton T‑shirts will show the design vividly, but dark fabrics may require a white underbase. The AI or EPS file can be recolored—an advantage many overlook. If you’re printing on mugs or pillows, the CMYK color profile is more accurate for offset work. The design comes as a vector, which means you can adjust hues, contrast, and saturation in your vector software. A common fix: for dark garments, invert colors to negative or add a white outline to improve contrast. But if you use the original PNG without editing, you might lose the cat against dark backgrounds.
Real‑World Example: Using It for a Game Night Logo
A small gaming café wanted to use this cat as part of their weekly “Dungeons & Kittens” event logo. They tried to place the PNG directly into a flyer template, but the design looked tiny. They didn’t scale it correctly, so the resolution suffered. After reading about vectors, they opened the SVG in Canva, enlarged it to fit the header, added a text layer, and exported as PDF. The result: a crisp logo printed on A3 posters. Mistakes avoided: using PNG, not checking scaling, and not exploiting the transparent background for a clean look on a deep purple banner.
Mistake #6: Forgetting Licensing and Usage Rights
Most digital designs like this come with a commercial or personal use license, depending on the seller. A typical mistake is assuming you can resell the raw design itself as your own. You’re usually allowed to use it in a finished product (stickers you sell, T‑shirts you print, etc.) but not to redistribute the original files. Check the product description. If you plan to sell items with this cat, ensure the license covers commercial use. Many creators also overlook that they cannot claim copyright over the artwork itself. Being aware of this avoids legal issues and respects the original artist.
Better Approach: Organize Your Vector Files by Project
Once you understand what the “Cute Cat with RPG Dice” design can do, make a habit of storing your SVGs, EPS, and AI files in a separate folder. Name them clearly—like “cat_d20_vector.ai” and “cat_d20_svg.svg”. This way, when you need to create a new sticker design or a game night invitation, you grab the right format immediately. Many users waste time hunting through downloads and end up using the wrong file because they forgot they had a vector version. A little organization goes a long way in efficiency.
Mistake #7: Not Using the Design on a Suitable Surface
The kitten with RPG dice is perfect for a range of materials, but some surfaces require preparation. For instance, if you’re engraving on wood or acrylic with a laser cutter, the vector file’s line art works beautifully—but you may need to convert the fill to a stroke depending on your machine. For ceramic mugs, sublimation requires a special coating. Ignoring these specifics leads to faded or smudged results. Always read your machine’s guidelines and do a test piece. The design itself is flexible, but application technique matters.
What to Check Before You Download or Buy
- File formats offered: Does it include SVG and EPS? Are they editable? Some sellers only give PNG. Confirm you have the vector versions.
- Resolution: The 300 DPI PNG is good for print, but check the pixel dimensions (e.g., 4000×4000 or smaller). Know the original size.
- ZIP extraction: Are you comfortable with unzipping? If not, ask the seller about alternate delivery.
- License: Personal, commercial, or both? Read the fine print.
- Preview the design: Ensure the cat’s expression and die orientation match what you envisioned. Slight variations exist between sellers.
- Software compatibility: Do you have tools for SVG/EPS? If not, plan to use the PNG at its native size.
Final Practical Advice for Creatives and Small Business Owners
The “Cute Cat with RPG Dice” design is a delightful asset—but only if you handle it correctly. Avoid the trap of treating it as just another image file. Embrace the vector formats. Test prints before bulk production. Understand your machine or software’s requirements. And remember: a transparent background is your friend, not something to fill with white. Whether you’re a hobbyist making stickers for your board game group, a freelancer designing a logo, or a small business printing T‑shirts, a little upfront knowledge transforms this cute cat from a pretty picture into a profitable, polished element. Take the time to learn the tools, and the result will be far more satisfying—and professional.