Pixel Art Photo Effect: Your Ticket to Retro-Inspired Digital Art
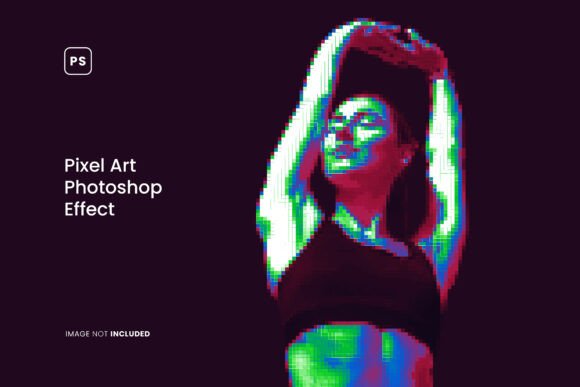
Transforming a standard photograph into a vibrant, blocky pixel art masterpiece is one of the most satisfying ways to bring a nostalgic gaming aesthetic to your projects. The Pixel Art Photo Effect makes this transition seamless, offering high-resolution PSD files, smart object layers, and customizable color schemes. But as with any specialized effect tool, there are common mistakes that can turn a promising edit into a frustrating outcome. Whether you're a seasoned designer or a hobbyist exploring pixel art for the first time, understanding these pitfalls will save you time, preserve quality, and ensure your final piece looks both authentic and polished.
The Trap of Skipping Resolution and DPI Checks
Many users assume any photo will work fine because the effect “pixelates” everything. The reality is that if your source image is small or low-resolution, the pixelation process can amplify blur, noise, and compression artifacts. The Pixel Art Photo Effect is built to deliver clean results, with a native resolution of 4500 x 3000 pixels at 300 DPI. That specification exists for a reason: it gives the algorithm enough data to create crisp, uniform squares without muddy transitions. Starting with a low-res selfie or a web-sized thumbnail will leave you with chunky, uneven blocks that look more like a glitch than intentional pixel art. Always begin with the highest resolution image you can find, ideally close to the PSD’s canvas size. If you must use a smaller photo, upscale it in advance using a dedicated enlarging tool to avoid aliasing issues.
Pixel Size: One Setting Doesn’t Fit All
A frequent oversight is leaving the pixel size on its default value without considering the subject matter. A portrait with fine facial features requires a smaller pixel size to retain recognizability, while a landscape or abstract pattern can handle larger blocks and still look intentional. The Pixel Art Photo Effect gives you full control over pixel size, yet many creators apply a single setting to every image and wonder why some results look like a mess of colored squares. The better approach is to test three or four different pixel sizes on a small section of your image before committing. For example, a pixel size of 4–6 works well for faces with distinct eyes and mouth, while a size of 10–15 can create a bold retro arcade feel for objects or characters. Don’t be afraid to go even smaller if you want a more detailed, almost “8-bit HD” look. The key is to match the granularity to the level of detail you want to preserve. Take notes on what works for different photo types, and you’ll develop an instinct for the right size in seconds.
Overlooking the Color Palette’s Role in Mood
The effect includes three distinct color schemes, but many people treat them as a simple toggle rather than a creative choice. Using the wrong palette can drain the personality from your pixel art. A vibrant, high-contrast palette might be perfect for a game character or a playful social media post, while a muted, retro palette can evoke the feel of early arcade machines. The included schemes are starting points, not limitations. Because the effect is fully customizable, you can alter any color directly in the PSD to match your brand, a specific era, or the mood of your photograph. The mistake is to assume “one palette fits all” or to ignore the scheme altogether and leave it on the default. Try each of the three built-in palettes, then fine-tune by adjusting hue and saturation on the color layers. If you’re creating a series of images (like a set of profile badges or game sprites), keeping a consistent custom palette will unify your work and give it a professional polish.
Misunderstanding Smart Object Layers
The Pixel Art Photo Effect relies on smart object layers for quick editing: you double-click the smart object thumbnail, paste your photo, save, and the effect applies automatically. This is arguably the most convenient feature, yet it’s also where most confusion occurs. I’ve seen users try to edit the layer directly, flatten the document, or even resize the smart object itself, breaking the link to the effect. The proper workflow is simple: open the PSD, locate the layer labeled “Double Click to Insert Your Photo,” double-click, replace the placeholder image, then save and close that tab. Do not move, rename, or delete any of the adjustment layers or color folders. The ReadMe.txt file included with the download walks through this process in one page. Taking two minutes to read it can prevent the frustration of a broken file. For those who are new to smart objects, practice on a copy of the PSD first. Once you understand the nesting, you’ll be able to swap images in under thirty seconds.
Neglecting the Final Use Case
Pixel art intended for a 200x200 pixel social media avatar has very different requirements than a banner graphic or a game sprite sheet. The same effect settings that look fantastic on a large poster may appear too coarse or too fine at a smaller display size. Before you begin editing, decide where and how the final image will be used. For web use, consider that a 4500 x 3000 pixel file is massive; you may need to downsample after applying the effect to avoid long load times. For game assets, you need to match the pixel grid to the engine’s coordinate system (e.g., 16x16 or 32x32 tiles). The Pixel Art Photo Effect is flexible enough to handle both, but only if you plan the export resolution and pixel size in advance. A common regret is creating a beautiful pixelated portrait that looks perfect in Photoshop, only to find it appears blurry or distorted when uploaded to a platform that resizes it. Always export a version at the exact dimensions you intend to use, and check it at actual pixel view before publishing.
Expecting Every Photograph to Translate Perfectly
Pixel art thrives on clear shapes, strong contrast, and minimal clutter. A photo with a busy background, many similar colors, or low contrast will produce a muddy, unreadable result. Users sometimes blame the effect when the issue is the source material. The correction is to choose images with a distinct subject, good lighting, and separation between foreground and background. For example, a close-up of a cat against a plain wall will convert much better than a wide-angle shot of a crowded street at dusk. If you have a great photo that isn’t ideal, pre-process it: increase contrast slightly, simplify the background using a mask, and consider converting it to a limited color palette before feeding it into the effect. The PSD’s smart object makes this easy because you can edit the image before saving. Use curves and color balance to boost definition, and your pixel art will look intentional rather than noisy. Don’t be afraid to composite multiple elements or use a solid-color background to achieve that classic retro-game look.
How to Avoid the Most Common Mistakes
Getting the best results from the Pixel Art Photo Effect comes down to preparation and experimentation. Start by reading the ReadMe.txt file—it’s short and answers the most frequent questions. Use high-resolution source images (at least 2000 pixels on the longest side) and always keep a backup copy of the original PSD. Test different pixel sizes and color schemes on a duplicate layer before committing. If you’re working on a series, create a template with your preferred settings to maintain consistency. And when you’re done, export at the target size and check how it looks on the intended platform. Because the effect is built with smart objects, organized layers, and three ready-to-use color schemes, you can iterate quickly once you avoid these early errors. The process becomes enjoyable rather than frustrating, and your pixel art will start turning heads for all the right reasons.
The Pixel Art Photo Effect is a powerful tool that bridges nostalgia and modern design, but like any tool, it performs best when used thoughtfully. By respecting resolution, adjusting pixel size to your subject, choosing the right palette, understanding layers, planning for the final output, and selecting appropriate source photos, you’ll unlock the full potential of this effect. Whether you’re creating social media graphics, game assets, or personal art projects, these simple corrections will elevate your work from a simple filter to a genuine pixel art creation. Download the file, open the PSD, and start experimenting with the freedom that high-quality customization provides. Your next retro masterpiece is just a few clicks away.